Admin Setup Guide for Connect
This guide helps Seamless owners and admins configure email and call settings, ensuring new users can start prospecting quickly with compliant and optimized defaults.
Admin Setup Guide for Connect
As a Seamless Admin, setting up your email and call settings ensures a smooth experience for every new user. This guide walks you through how to properly configure your platform so your team can jump right into prospecting without worrying about manual setup or misuse.
Connecting Your Email
To begin using the Email Tool, you’ll need to connect a Gmail or Outlook account.
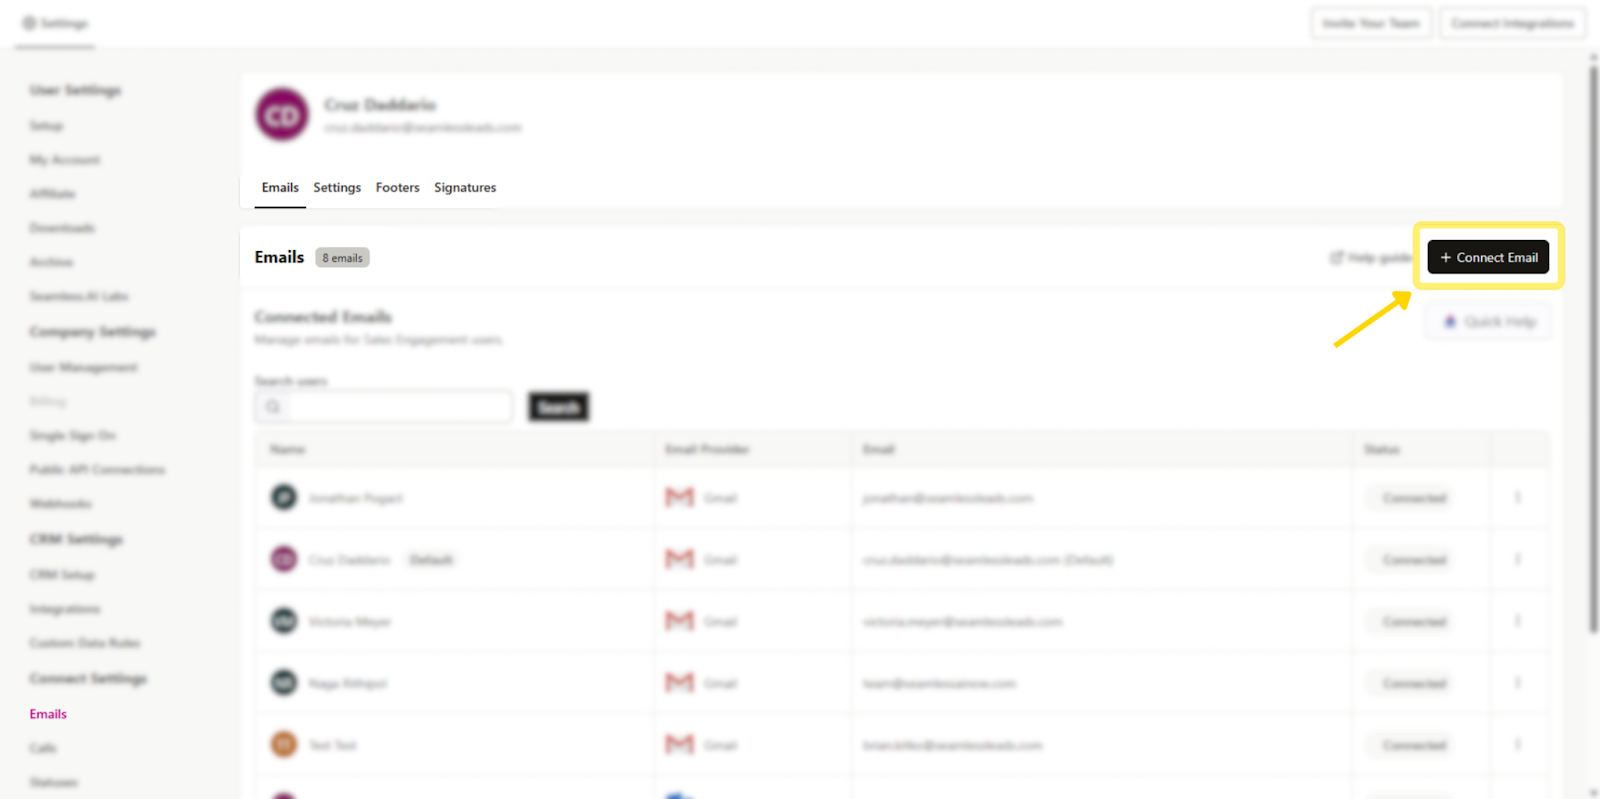
How to Access Email Connection Settings
You can connect your email in two ways:
- Navigate to Settings > Emails from the main dashboard.
- From the full Settings Panel, scroll to Connect Settings > Emails.

How to Connect Your Email
- Click “+ Connect Email.”
- Choose your Gmail or Outlook account.
- A new secure window will prompt you to sign in to your email account.
- Accept the Privacy Policy and grant access when prompted.
- Once completed, your email will be successfully connected and ready to send.
Each user must have their email connected to send outreach through Seamless.
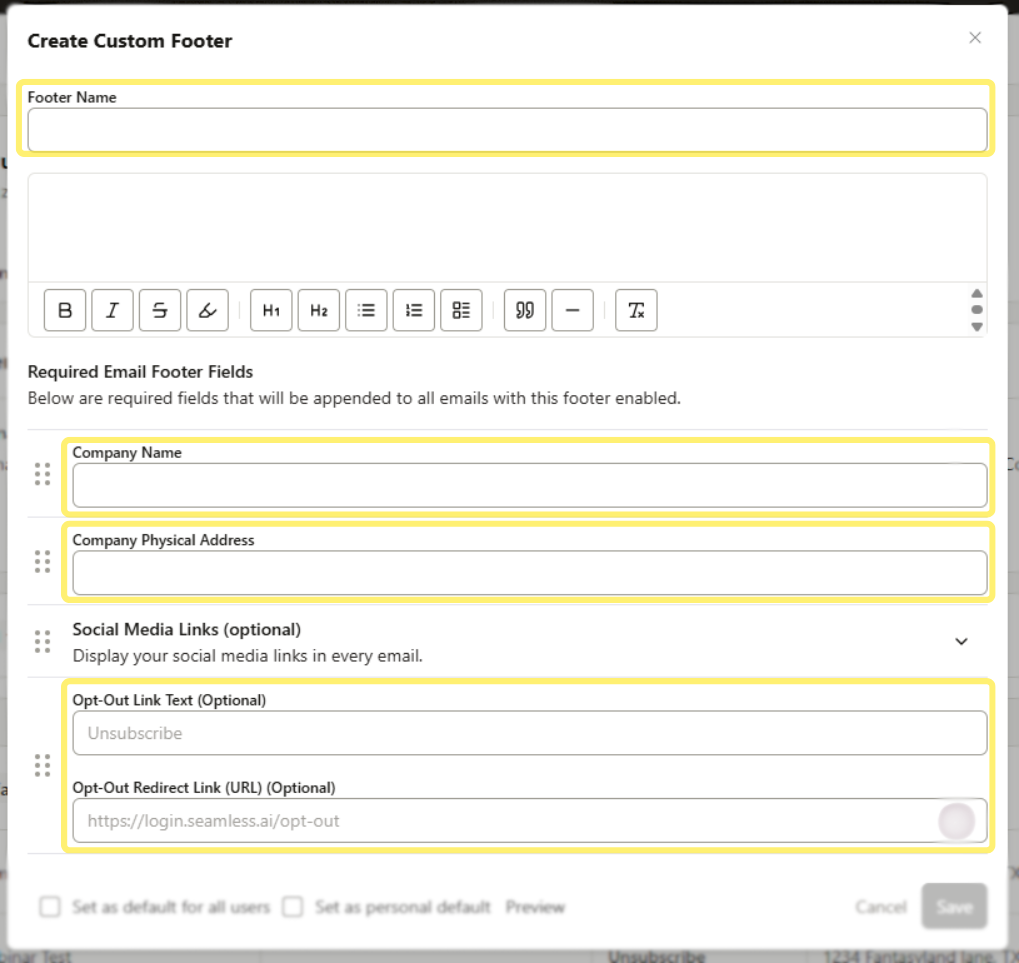
Setting Up Your Footer (CAN-SPAM Compliance)
After connecting your email, you’ll be prompted to create a custom footer—a mandatory step for CAN-SPAM compliance.
Steps to Create Your Footer
- Go to Settings > Emails > Footers
- Click “Create Custom Footer”
- Fill in:
- Your Company Name
- Your Business Address (Business Headquarter’s Location)
- An Unsubscribe Option (automatically included)
Admins can set this footer as default for all users. Without a valid footer, users will not be able to send emails from Seamless.
Global Email Settings (Admin Controlled)
As an Admin, you can configure default settings for all users and control edit permissions using the “Allow User Edit” toggle.
Daily Send Limit Per Inbox
By default, email inboxes do not have a daily send limit when first integrated. As a best practice, set a daily send limit per email inbox to protect email deliverability. Recommended: 250 or less per inbox to maintain deliverability.
If you are interested to learn more about email deliverability best practices, check out this article: Email Deliverability Best Practices
Email Delay (Seconds)
Control how much time is delayed between each send. Recommended: 60 seconds for human-like cadence.
.png)
Domain Send Limit
Cap total emails sent across your domain each day. Recommended: 250 or fewer to protect sender reputation.
Domain Exclusion List
Block sending from specific domains org-wide (e.g., Gmail, competitors).

Domain Blacklist
Prevent emails from being sent to specific domains by separating them with commas.
Business Hours
Set active sending hours to align with prospect time zones. Recommended: 9AM–5PM (recipient’s local time).
Email Tracking
Enable:
- Open Tracking
- Click Tracking
- Reply Tracking
Default Font Settings
Standardize the look and feel of outbound messages.
Notifications
Enable alerts for:
- Failed sends
- Below-threshold AI Score
- Sending outside business hours
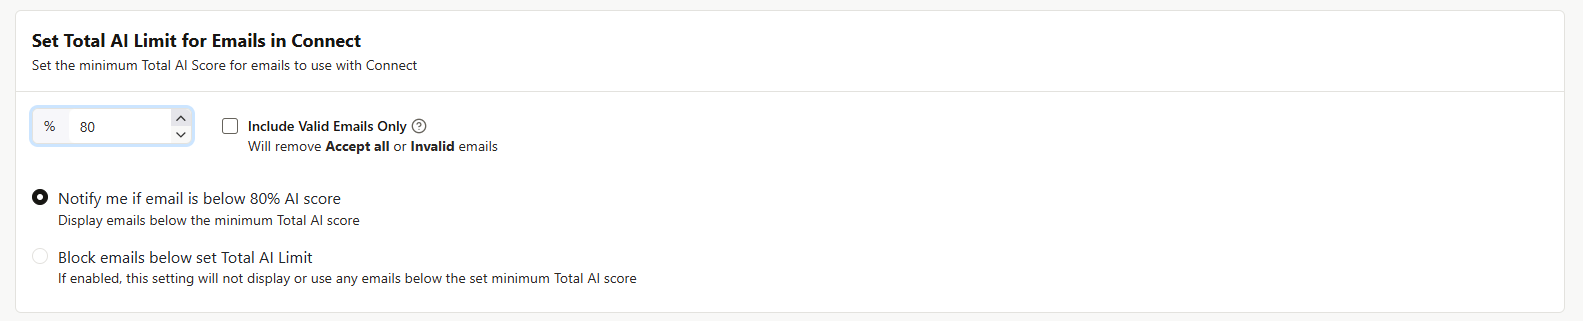
Total AI Score
Filter out low-quality emails using AI Score. Recommended threshold: 80%
Call Setup & Configuration
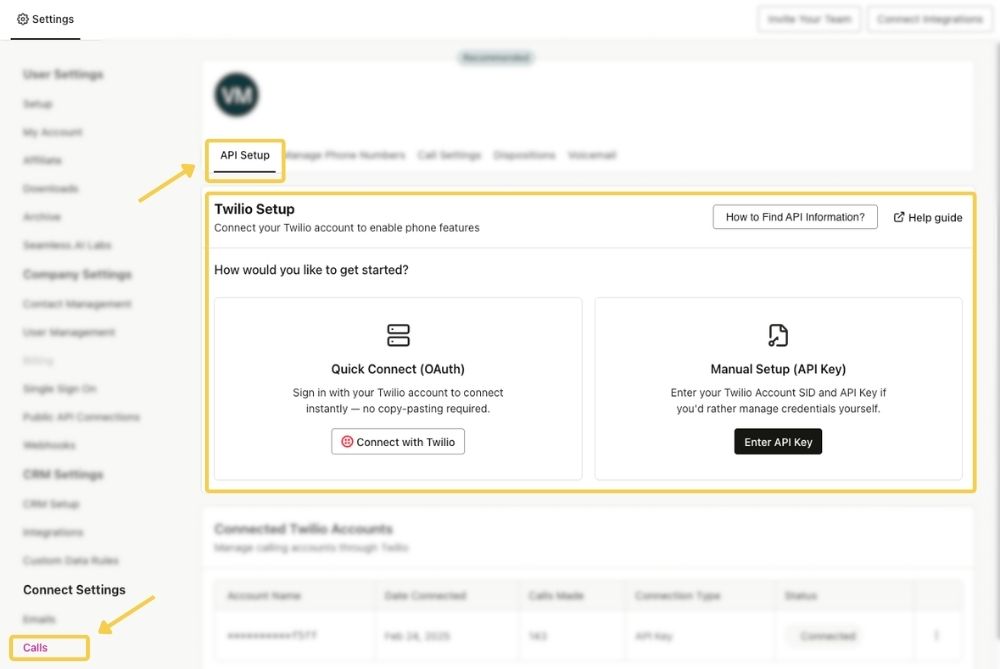
API Setup for Calling
Admins can integrate Twilio under Settings > Calling > API Setup:
- Enter your Twilio API Key
- Fill in all required fields
Only Admins need access to this page.
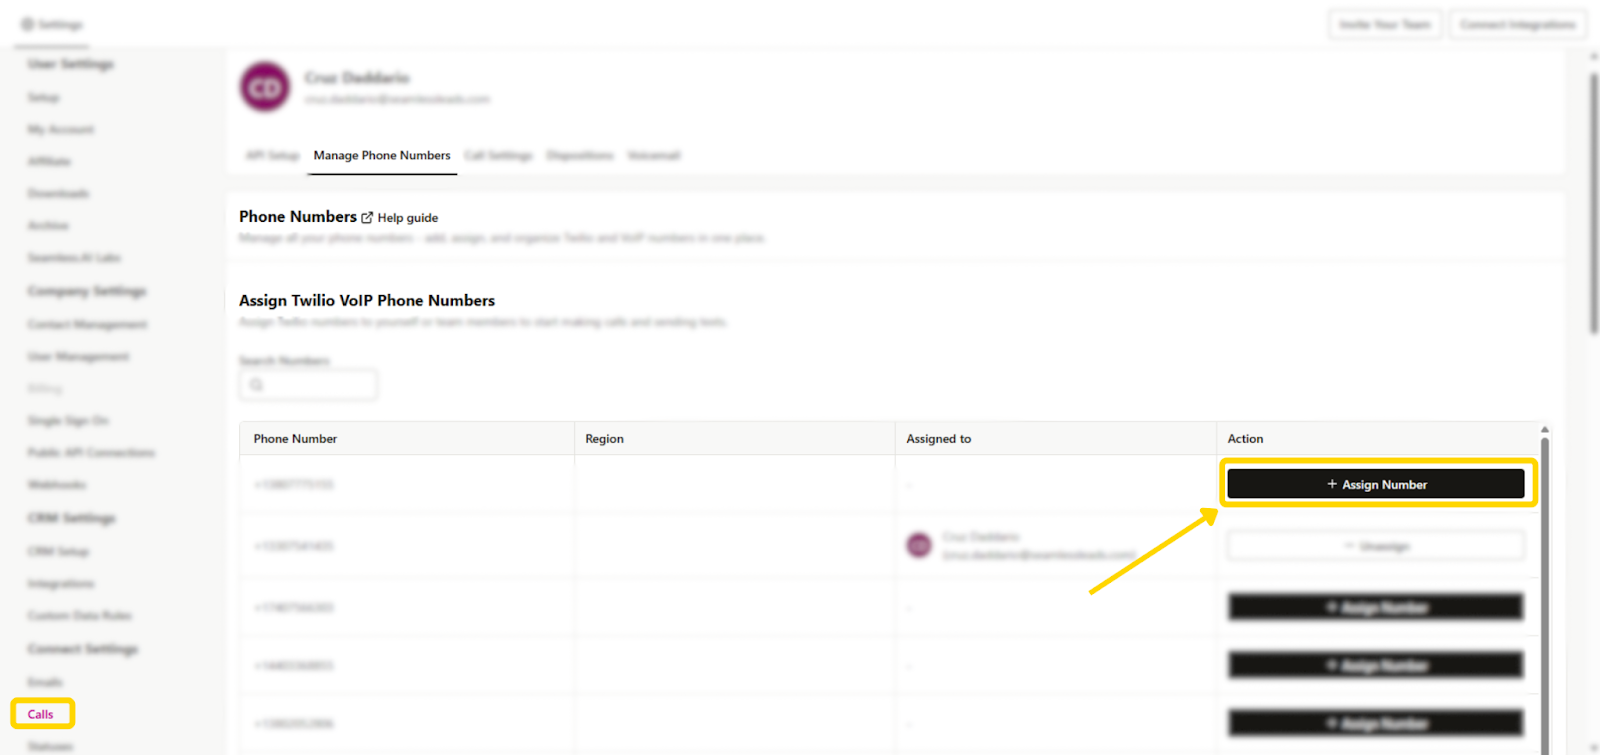
Assigning Twilio Numbers
Admins can assign Twilio numbers to users:
- Go to Manage Phone Numbers
- Under Action, click Assign Number
- Select a user and confirm
To Add New Numbers:
- Scroll to Add New VoIP Phone Numbers
- Select and click Add to Twilio Numbers

Call Settings (Admin Controlled)
You can customize and restrict user access using the “Allow User Edit” toggle for each setting.
Pass-Through Calling
Route calls through an external number (e.g., cell phone).
Outgoing & Incoming Call Routing
Automatically forward calls to pass-through numbers.
Call Recording
Enable call recording across all calls. Optionally default all calls to “recorded.”
Local Dialing
Let users match local area codes when calling leads.
Phone Number Prioritization
Set call order: Mobile > Contact > Company
Total AI Score for Calls
Only display high-quality phone numbers. Recommended threshold: 80%
Select Phone Types in Connect
Choose which number types are available in Call Connect:
- Contact Only
- Company Only
- Contact + Company
Dispositions, Sentiments & Voicemail
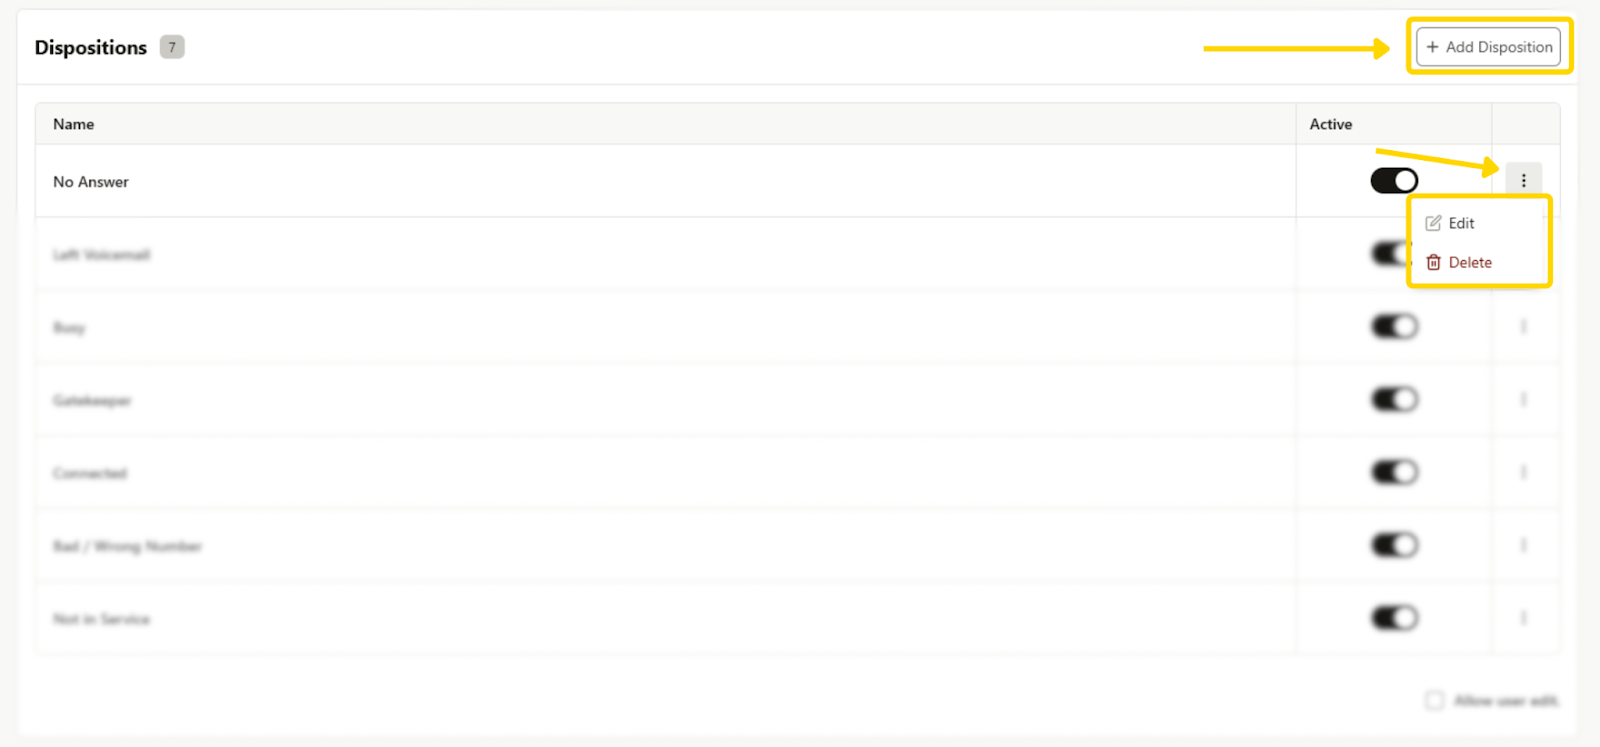
Dispositions & Sentiments
Enable outcome and sentiment tracking for all calls. Admins can choose to require these fields.
- Disposition Examples: No Answer, Left Voicemail, Connected
- Sentiments: Positive, Neutral, Negative
- Create, edit, or remove options in Call Settings > Dispositions
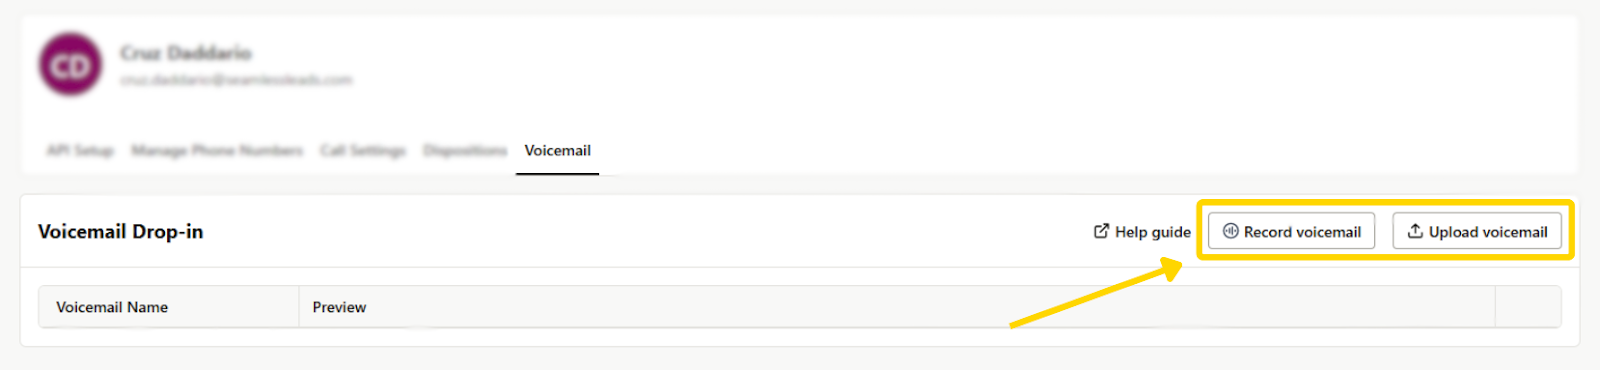
Voicemail Setup
Upload or record a voicemail to streamline follow-ups:
- Click Record or Upload Voicemail File
- Give it a clear name for future use
Best Practices for Admins
- Lock down critical settings using “Allow User Edit” to control consistency across your org
- Set recommended defaults to streamline onboarding
- Use email footers and AI score limits to stay compliant and maintain quality
- Review settings monthly to optimize perform